Category Archives: DIY Hell

YAHIP – The Shed

YAHIP is a catchy term, isn’t it? Sounds like a great .com site, with like memes or something else catchy on it. But it actually stands for something much, much worse: Yet Another Home Improvement Project.

So now that I’m with child – that sounds wrong, I’m not pregnant, although that would make me pretty rich…

But anyway, now that I have a child, I’ve come to realize that despite my best efforts, he will always have more things than I can store in my home. And when it comes to outside things, I said to Jen that we need to find places to store outside things before we get them. And I very much lost that battle. The stuff came and I couldn’t do a thing about it!

So I started working on a new project at home, “The Shed.”

Sounds like a Dharma Station… The Shed…

I just made that in Photoshop. That’s actually pretty awesome and I’m going to have to get that printed and put on the shed.

ANYWAY!

So last summer we got a retaining wall put up in our backyard. The reason – the backyard was so overgrown and could not be maintained in it’s current condition. We wanted to make it look nice, but couldn’t keep the weeds out. Plus, by putting in the retaining wall, we got some more yard out of it, and I convinced Jen to add a patio and firepit.

I had one small complaint – I wanted to get more yard out of it then we did. However, with that being said, the people we had come and do it did just an amazing job, and I think if they tried to give us more yard it would have actually looked worse, cost us a ton more, and we would have needed special permits to go with a retaining wall above 4 feet. So… good job them.

To expand a little though on my desire to maximize my yard space, here’s the deal – about 2000 square feet of my property is unusable. It sits on top of a giant rock wall. We’re talking two story tall, carved out by glacier during the last ice age, rock. In front of that was dirt that sloped down to my yard, which, despite our best efforts after buying the house, would become overgrown shortly after the start of every spring. So the retaining wall cut back on the slope a decent amount, again giving us some more yard, and we used some of the space as well for an elevated patio and firepit. Again, it looks awesome.

Before
After
And then add a little mulch!

Okay, so now you have the backstory of The Wall… Sorry, no Dharma logo for that.

Now, since I am crazy, I want to utilize every inch I possibly can.

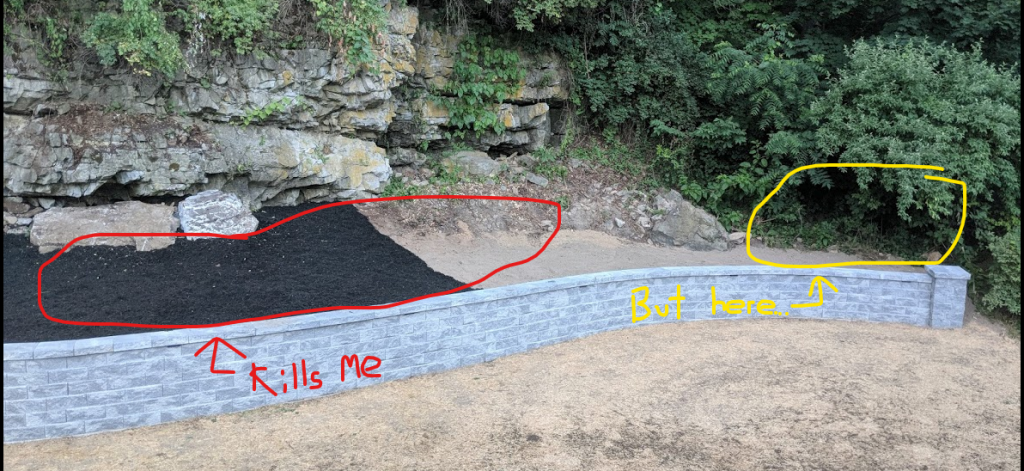
The spot on the left (circled in red) I really can’t do anything about. not only is it sloped, but there’s no real access to the spot because of a big rock to the right of the red circle.

The spot on the right (circled in yellow), however, now that I can probably work with. It has a small incline up from my yard, but nothing too steep. Maybe I can do something there. So I got out my reciprocating saw, and started to cut everything around there that was growing. Then got out my shovel and pick ax and started to dig. I’m now left with a relatively level section of property back there.

My plan is to next slope the back a bit, so it’s not just a steep four foot drop off, then pour stone on top, and then have a shed built there.

The project has definitely had some challenges, like giant rocks that needed to be excavated:

And the amount of smaller stone stone that was pulled out was incredible and used to continue to build up the wall I created around the town property. But overall, the “dig” has been pretty straightforward.

I do have that rock that was pulled out from above sitting in my yard, and will need to do something about that soon.

Overall though I’m pretty happy with the progress.

And because I’m obligated to show off my son, Connor has actually been loving every minute of this project and wants to help at every stage.

WeMo Update

So a while back, a looong while back (since I only post every six months, you know, it was like three posts ago), I wrote about my issues with WeMo. I never really did anything about my problem, because Google did it for me. It’s funny, actually, because my gut instinct when I run into a wall with technology is “I can program something to fix this.” I don’t know if that’s a healthy reaction, but it’s what comes to mind most often. My issue is I have two problems when it comes to programming something:

  1. I never finish anything.
  2. I never have enough time.

So going back to my previous post about WeMo, I wanted to make something that could access my WeMo’s, have a web interface, see stats and graphs of usage, group WeMo devices together for easier control, and have this functionality both inside and outside my house.

Believe it or not, that was about two and a half years ago I posted about this.

Not much has changed, actually. I don’t have a web interface and don’t have better stats and graphs. But what did change is I got a digital assistant – Google. And I learned that much of the other stuff doesn’t matter. Let me explain, but first…

I don’t want this to be a “Google Home is great and wonderful!” type post. The fact is, what I’m doing with it is probably the same that I can do with Alexas. Siri, well, that’s another story. And I think Cortana lost all her lives. But between Big Alexa and Google, I’m pretty sure the feature set is about the same today.

Anywho, what I quickly learned about my Google Home is that it let me do exactly what I wanted as far as grouping. You create “rooms,” and can then add smart devices into it. Here’s the cool thing: you can mix smart devices in a “room,” so for example I can have WeMo outlets, Phillps Hue Bulbs, a Nest Thermostat, and a Chromecast, and Google will interact with them together. It’s really quite nifty.

I use “rooms” in quotes because a room can be pretty much anything. Like I have a “room” called “Christmas Lights,” which consists of WeMo outlets around my house. Then when I ask Google to turn on my Christmas Lights, it’ll turn on the random outlets spread throughout my house.

Changing topic slightly to digital assistants, I recently made a comment (MP3 / YouTube) that was read out on one of my favorite podcasts, DTNS, about how I can include in a room a Google Home device. By doing that, I can now ask that specific Google Home to “turn on the lights,” and Google is smart enough to turn on just the lights in the room it is located in. That’s pretty nifty in my book. I would assume Alexa can do the same thing, I just don’t have familiarity with it. I do have other thoughts about digital assistants, but I’ll post about that at a later time. I’ll try not to wait 6 months!

And finally, I made mention of using a Raspberry Pi to use as a link between my smart home devices and the outside world. The Raspberry Pi would have been ideal because it’s a low-powered device and I would be able to program it like I could create a program for any PC type device. But as it turns out, my needs changed. And I now have a full fledged PC running in my office closet that is used for a Plex server. I’m really excited about this nifty free program, and am looking forward to posting more about it as well in the future.

WeMo MoWoe

So thanks to the Christmas season, I found myself in the Home Automation market.  And I decided to start with WeMo.  Now please don’t see this as an endorsement of any kind, since there are literally hundreds of products out there that do the same thing, and some may even be much better at it than WeMo.  But for what I was looking for, WeMo did what I wanted and then some.

First, some background:
I like Christmas lights.  A lot.  And by a lot I mean 4,670 of them this year.  That doesn’t include the hundreds inside either (like the ones on the tree, the banister, the little decorative trees and the like).  My problem – not enough electricity on a single outlet.  And because there isn’t enough electricity on a single outlet, I needed a new way to control how they turn on and off if I want to use more than one outlet (which I did!).  I needed something that could do the job with some relatively synchronized timing.  In other words I didn’t want to see half of my lights on and the other half off for 20 minutes.

Enter “Smart Outlets”
So the easiest way I could find to do this was using Smart Outlets.  They all seemed to fit the bill, but WeMo had a couple of legs up for me:

  1. They had an in-wall Smart Switch which I really liked.
  2. They had an easy to use Android app.
  3. The outlets and switches could be automated using sunset and sunrise as conditions.
  4. The outlets could track energy usage.
  5. They have a product called WeMo Maker which lets you create your own WeMo integrations with other devices, like a Garage Door Opener.

So with all that in mind, I set out to WeMo-ify my home.

Setup was pretty simple, although I struggled setting up my first outlet because of some sort of incompatibility between the app and my phone’s WiFi settings or OS.  The trick – turn on Airplane Mode, then turn on WiFi, and then the app worked beautifully.

After I got everything up and running, and I was happy with how it worked, I tried to group the two outlets together… only to find that’s not a thing.  You can group “Smart Bulbs” together, but not outlets.  And while this doesn’t impact me, apparently after you group “Smart Bulbs” together, you can’t control them independently.  That’s a bummer.  But alas, IFTTT to the rescue!  I think…

For those of you not in the know, IFTTT stands for “If This Then That.”  It’s a pretty cool free service since it lets you integrate random networked technologies together to make them do interesting things.  For example, when I open my Smart Garage Door, turn on the Outside Lights.

The problem with IFTTT was similar to my problem with WeMo though, you can’t really group things together, and you can’t string multiple conditions together (or at least I think you can’t – not natively at least).  So for example, I can’t say “When I Open My Garage Door” AND “It’s Before Sunrise” THEN “Turn On Outside Lights.”

Bummer.

To pour salt in the wound, the WeMo outlets I bought, called WeMo Insight Switch (Why do they call them a “switch?”  Could you make it any more confusing?) can track energy usage.  Awesome, right?  No.  Because the app is so anemic in functionality, it can show you some basic stats and email you a CSV file of information on a schedule.  No pretty graphs.  No usage tracking.  Nada.  Lame.


So here’s what I’ve done – thankfully I can use IFTTT to turn everything on with the push of a button on my phone.  I have it set up to turn on all my outlets.  If I buy any more than the current two outlets though, they too will be triggered by this IFTTT button.

Bummer again.

But the WeMo app does let me create a schedule and lets me identify the things I want turned on at sunset (or even a set amount of minutes before or after sunset – nice touch WeMo).  So that’s how I am controlling my two separate Christmas light outlets.


But I want more.

A. I want an interface that’s easily accessible and faster than the WeMo app.
B. I want a web page I can log in to to see and control everything.
C. I want to see more statistics, charts and graphs.
D. I want to be able to group anything together and control it as a group, but still retain the ability to control it individually.
E. I want to be able to do all of this from both inside and outside my house.

Thankfully, I’m a programmer.  And thankfully, WeMo is pretty open to letting people tinker with their stuff, thanks to a system that is pretty much web based that lets you pass commands back and forth using some SOAP and XML.  Now in full disclosure, they have discontinued their SDK, but that was really only for Android and iOS app developers.  They also don’t let you do stuff to WeMo devices remotely – they claim it’s a security risk to their cloud.

The game plan?  Well, it’s still early on, but I think I can use a Raspberry Pi and either home-grown programming or this controller API humorously named ouimeaux to accomplish my dreams.  And if all goes well, this might be something I could actually sell to others, a cloud service perhaps… but lets not get a head of ourselves.

Step one would still be to mess around with ouimeaux and see if I can get it to bend to my will.  Then I would look in to purchasing a Pi and seeing what’s possible.  I would also want to carve out some space on my web server to act as a front-end to all of this, since I wouldn’t want to open up local ports on my router in order to issue commands from outside my WiFi – especially if I begin to market this to others….

We shall see what comes of all of this… probably nothing initially, but it’s definitely a project I’d love to play with.


DIY Hell: It Begins

I’m cheap.  And poor (read: “house poor”).  And there are things I feel I should be able to do myself and not have to hire someone all the time to do.  Electrical I feel I can handle.  And since buying a house, working with sheetrock and plumbing* isn’t too far out of my realm.

* I have not worked with, nor do I plan on working with, copper pipes.  PVC for drains is fine. Copper, not going to happen.

One side note – when it comes to my car, I let a mechanic handle that.  Anything that I travel in at 65+ mph is not going to be my responsibility to maintain.  I let someone who knows what they are looking at work on it.

So anyway, here goes.  At home, I have a one zone HVAC system.  It is a forced hot air furnace with central A/C.  Not uncommon stuff here, but it gets weird.  I have two separate thermostats.  It’s actually very logical – one upstairs controls the A/C and the one downstairs controls the Heat.  Since heat rises, it makes sense that’s downstairs and since cool air sinks, that thermostat should be upstairs.

Both thermostats were the old dial kind.

Now recently I replaced the downstairs Heat thermostat with a digital programmable model.  Great investment too.  I’ve been very pleased and happy waking up to the heat already coming on, and coming home to a nice warm house while reaping the benefits of turning down the heat when I’m at work.

But I tried to get a little fancy with the installation.  You see the old Heat thermostat just had a dial, no on or off options for anything.  And the new thermostat has the ability to turn the fan on without calling for heat.  The upstairs A/C dial thermostat actually has a switch to also do just this.  So I thought, wouldn’t it be great if both thermostats could be used to call for the fan to turn on by itself?

For those of you who might be HVAC experts, I “accomplished” this by connecting the Green wire from the thermostat to the furnace motherboard (or whatever HVAC people call the main piece of circuitry inside the furnace!).  The A/C thermostat also connects this way.

However when I turned on the fan using the Heat thermostat, the A/C compressor kicked on.  Not what I wanted.  Apparently, because I called for the fan to be on, the upstairs thermostat which was set for “auto” mode thought that since the fan was running the compressor should also be running.  And called for the compressor to kick on.

So I abandoned the idea.  It wasn’t that big of a deal.  Until today.  You see, having forced hot air heat is very dry. So dry that Wife gets nosebleeds, and I’m pretty sure it’s also leading to sinus headaches I seem to get during the winter.  We bought a small one room humidifier to solve this problem, but they are a pain to clean daily – we do it because it’s the right thing to do blah blah blah.  And I don’t think my sinuses are appreciating the changes in humidity on a 15 minute basis when I’m in other rooms of the house.

The solution is to buy a whole house humidifier.  And I found the perfect model because it meets our crazy criteria.  We need something that’s not a pain to maintain, that can fit in a ridiculously tight duct space, and does not require a floor drain, since our furnace is on the first floor of which is on a concrete slab.  The Humidifier we found was an Aprilaire 400, which satisfies all of this, plus comes with some neat features, like an “automatic mode” which will use the outdoor temperature to decide what time of humidity we should have in the house plus be able to humidify the house even when the heat is not called for by running the fan alone without the rest of the furnace.

Alas, we have stumbled on to our problem! So this unit will be able to turn on the fan by itself when needed by wiring in to the furnaces Green wire terminal, which means (if you’ve been paying attention) it will trigger the central air compressor to kick on.

At least that’s what I’m afraid of.  Welcome to day one of DIY Hell.  I haven’t even bought anything, and already I can see this being an issue.